Beginner's Guide of Collecting Stamps, Forever Stamps
How to Address a Postcard?[Step-by-Step Guide]
![How to Address a Postcard?[Step-by-Step Guide]](https://www.postagestampsdeals.com/wp-content/uploads/2023/08/How-to-Address-a-Postcard?Step-by-Step-Guide-1400x700.png)
Aug
Addressing a postcard might seem simple, but attention to detail ensures your message reaches its destination accurately and efficiently. Follow these step-by-step instructions to master how to address a postcard.
Step 1: Choose the Appropriate Side

Addressing a postcard begins with selecting the right side for writing the recipient’s address and your message. This step might seem straightforward, but it sets the foundation for a well-organized and visually appealing postcard.
Front Side vs. Back Side
Postcards typically have a designated “front” side, which features an image, artwork, or design. The opposite side is called the “back” side, where you write the recipient’s address and your message.
Determining the Appropriate Side
To identify the appropriate side for addressing your postcard, consider the following:
● Design and Imagery: Look at the postcard’s design. The side with the image or design is the front side. This visual element is meant to grab the recipient’s attention and provide context for your message.
● Blank Space: The back side of the postcard is usually left relatively blank, with designated areas for the recipient’s address, your return address, and a message.
● Pre-Printed Lines: Some postcards have pre-printed lines or boxes on the back side, indicating where to write the recipient’s address and your message. These lines guide you in positioning your text neatly.
In essence, the choice between the front and back sides is intuitive. Use the front side to display the captivating image or design, and reserve the back side for the practical details.
Step 2: Gather the Necessary Information

Before you start addressing your postcard, gathering all the necessary information about the recipient is crucial. Here’s a detailed breakdown of the information you’ll need to collect:
● Recipient’s Name
● Street Address or P.O. Box Number
● Apartment or Suite Number (if applicable)
● City
● State
● ZIP Code
● Country (if International)
Step 3: Write the Recipient’s information

Now, you can write the recipient’s information on the postcard.
- Full Name:
Start by writing the recipient’s full name. Use the first name, then the last name. - Use Clear Handwriting:
Choose a handwriting style that is neat and legible. Avoid cursive writing that might be difficult to decipher. Using block letters or print-style writing is recommended. - Punctuation and Titles:
Include any appropriate titles or honorifics, such as “Mr.,” “Mrs.,” “Dr.,” etc., before the recipient’s name. Add a comma after the title for clarity. - Additional Titles or Degrees:
If the recipient holds any professional titles or degrees relevant to the context, you can include them after the name. For instance, “Dr. Emily Johnson, Ph.D.” - No Nicknames or Abbreviations:
Use the recipient’s formal name rather than nicknames or abbreviations, which might lead to confusion during delivery.
Step 4: Your Return Address And Date

Your return address is also a crucial aspect of addressing a postcard, as it serves as a safety net in case the postcard is undelivered or needs to be returned for any reason. Keep reading!
● Top-Left Corner: Position your return address in the top-left corner of the postcard.
● Recipient’s Name: Start with your full name. Use your complete legal name for official correspondence.
● Street Address or P.O. Box: Write your address or P.O. Box number on the following line. Make sure it’s accurate and up-to-date.
● City, State, and ZIP Code: Write the city name, followed by the state abbreviation and ZIP code. Ensure the city name is written in legible letters.
Date:
Directly below your return address, include the date you’re sending the postcard. The date serves as a reference point for both you and the recipient.
Example of a Return Address:
John Smith
123 Main Street, Apt 4B
Anytown, CA 12345
United States
August 14, 2023
Including your return address provides several benefits. If the recipient has moved, the postcard can be returned to you. Also, postal services can contact you if there are any delivery issues. It also lets the recipient know who sent the postcard, especially if the message doesn’t include your name.
Step 5: Write Your Message in the Middle

Once you’ve addressed the postcard, it’s time to craft your heartfelt message in the designated space. The space you have is limited, so make every word count. Here’s how to make the most of this step:
● Express Your Message Clearly: Since you have limited space, get straight to the point. Share your thoughts, updates, or well wishes succinctly. Consider using bullet points or short sentences for easy readability.
● Share Memorable Experiences: When sending the postcard from a vacation spot or a unique location, describe your experiences briefly. Mention any exciting activities or discoveries you’ve made.
● Express Gratitude: If the postcard is a thank-you note, express your gratitude sincerely. Be specific about what you’re thankful for.
● Sign Off with Warmth: Wrap up your message with a closing that suits the tone of your note. Options include “Best wishes,” “Take care,” “With love,” or simply signing your name.
Step 6: Stick a Postage Stamp

Choosing and affixing the right postage stamp to your postcard is necessary. Stamp sticking is important, so you should:
- Determine Postage Rates:
Before selecting a stamp, research the current postage rates for domestic and international mail. Rates may vary based on the postcard’s destination, weight, and size. At present, the price of a standard requires a stamp worth $0.51. - Choose the Right Stamp:
Select a stamp that matches the postage requirements for your postcard. Stamps come in various denominations, so pick one that covers the required postage cost. - Check the Stamp Placement:
The top-right corner of the address side is the designated area for affixing the stamp. - Avoid Overlapping:
Ensure the stamp is affixed neatly without overlapping with other postcard areas. Overlapping stamps can cause issues during scanning and processing, leading to delays in delivery. - Verify Postage Amount:
Double-check the total postage amount by considering additional fees, such as international delivery or special services. Make sure the stamp value matches or exceeds the required postage.
Postcard Stamps: Postcard stamps may look similar to regular stamps, but key differences exist. The main distinction lies in their denominations and intended uses.
Intended Use
Postcard stamps are specifically designed for mailing standard-sized postcards, while regular stamps are intended for mailing letters and other standard-sized mail items.
Denominations
From the above content, we know that the postcard stamp has a lower value than regular stamps, as mailing postcards costs $0.51 while mailing other regular stamps costs $0.66.
TIPS: To use a postcard stamp, your postcard must be:
At least 3-1/2 inches high x 5 inches long x 0.007 inches thick (index card thickness)
4-1/4 inch high x 6 inch length maximum
Rectangular
Step 7: Drop-off or Mail

The final step is sending it to its intended recipient. You can drop it off at a post office or place it in a mailbox.
Option 1: Drop off at a Post Office
● Locate a Post Office: Find a nearby post office using online tools or a local directory.
● Packaging Considerations: If your postcard is larger or non-standard in shape, inquire about special postage requirements.
● Pay for Postage: Pay for postage based on the destination and postage type. They will weigh the postcard and calculate the cost.
● Get a Receipt: Collect a receipt as proof of postage. This can be handy in case of any issues during delivery.
Option 2: Mailbox Drop-off
● Choose a Mailbox: Find a mailbox near you. Ensure it’s an official postal mailbox.
● Check Pickup Times: Check the pickup times listed on the mailbox. Drop your postcard before the last pickup time.
● Place the Postcard: Slide your postcard into the mailbox slot.
● Flag Up: If your mailbox has a red flag, raise it. This alerts the postal worker that there’s outgoing mail to be collected.
International Mail:
● Customs Declaration: You might need to complete a customs declaration form when sending internationally. Check with the postal service for guidance.
● Value and Contents: Declare the value and contents of the postcard if required. This ensures smooth customs clearance.

Whether you opt for the convenience of a mailbox or the personalized service of a post office, both methods ensure your postcard embarks on its voyage to your recipient.
Check out our postcard stamps list below:
-
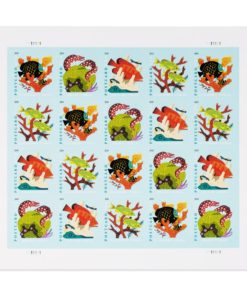 USPS Forever Coral Reefs Postcard Stamps$41.99 – $1,879.00
 -
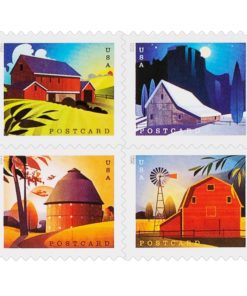 Forever Stamps 2021 Barn Postcard Stamps$41.99 – $1,879.00